Photoshop is more than just a tool for photo correction — it’s a powerful canvas for creating dramatic and stylized visual effects. One of the most dynamic and sought-after effects in visual storytelling is the dust explosion effect. This effect gives your still images a sense of motion, energy, and destruction, often used in sports posters, cinematic posters, or promotional art.
In this step-by-step tutorial, you’ll learn how to achieve this high-impact look using Photoshop actions, custom brushes, and a few pro tips along the way. We’ll break down the entire process so you can follow along—even if you’re new to advanced effects in Photoshop.
Whether you’re a creative professional or a beginner, this guide will empower you with new skills that will make your work stand out.
 Step 1: Choose and Prepare Your Image
1.1 Choose a Strong Subject
To start off, select an image with a clear, high-resolution subject — ideally a person or object isolated on a clean background. The dust explosion effect works best when the background doesn’t interfere with the subject’s edges.
1.2 Extend the Canvas
To make room for the explosion to spread:
-
Select the Crop Tool (C).
-
Drag the borders outward, especially in the direction you want the explosion to expand (usually left or right).
-
Hit Enter to apply.
1.3 Resize the Image for Performance
Photoshop actions often rely on consistent image sizes. Set your image to a width of 2,400 pixels to match most dust explosion templates:
-
Go to Image > Image Size.
-
Enter 2400 px width and keep the aspect ratio locked.
This also helps the action run smoothly without overloading Photoshop.
 Step 2: Install Brushes and Actions
To save time and create intricate effects quickly, we’ll use pre-built Photoshop actions and brushes.
2.1 Download the Required Files
Get the Dust Explosion Photoshop Action and accompanying ABR brush pack. These are usually packaged in .zipformat and available from design marketplaces or tutorials like the one at Beyond Keyframes.
2.2 Load the Brushes
-
Open Photoshop.
-
Go to Window > Brushes.
-
Click the hamburger menu on the top-right.
-
Select Import Brushes and load the
.abrfile.
These custom brushes will help create the scattered dust effect with just a few clicks.
2.3 Load the Action
-
Go to Window > Actions to open the Actions panel.
-
Click the same hamburger menu and choose Load Actions.
-
Select the
.atnfile to import it.
Once loaded, you’ll see a folder with the action steps ready to play.
 Step 3: Isolate the Subject
3.1 Make the Selection
Use the Quick Selection Tool (W) or Select Subject from the top bar:
-
Click Select Subject to let Photoshop identify the subject automatically.
-
Use the quick selection tool to clean up any rough edges.
3.2 Duplicate the Subject
With the selection still active:
-
Press Ctrl + J (Windows) or Cmd + J (Mac).
-
This duplicates the subject onto a new layer.
-
Rename this layer to
subjector something identifiable.
Having your subject isolated allows the explosion effect to apply without affecting the background.
 Step 4: Paint the Explosion Area
The explosion only happens where you tell it to.
4.1 Create the Brush Layer
-
Add a new layer above your subject layer.
-
Name this layer exactly:
brush— the action depends on it.
4.2 Paint the Zone
-
Select the Brush Tool (B).
-
Choose a soft round brush or one of the dust brushes you imported.
-
Paint over the area where you want the explosion to start (e.g., behind the subject or along one side).
You don’t need to be perfect—this is just a mask that guides the effect.
 Step 5: Run the Dust Explosion Action
5.1 Select the Action
-
Open the Actions panel.
-
Select the Dust Explosion folder.
-
Choose the main action (e.g., “Play Me”) and click the Play button.
5.2 Sit Back and Let It Run
The action will:
-
Duplicate layers
-
Apply masks
-
Create scatter effects
-
Add custom brushes and particles
This may take a few minutes depending on your system.
 Step 6: Customize the Dust Explosion
Now that the action has generated the effect, it’s time to fine-tune the results.
6.1 Reveal or Hide Dust
Most action packs create several groups like Dust Front, Dust Back, Particles, etc.
-
Use the layer masks to fine-tune visibility.
-
Paint with black to hide parts of the dust.
-
Paint with white to reveal more dust.
6.2 Adjust Explosion Direction
-
Select the explosion groups or layers.
-
Use the Move Tool (V) to reposition.
-
Rotate or skew with Ctrl + T / Cmd + T to match motion flow.
6.3 Tweak Dust Colors
-
Click on a dust layer.
-
Press Ctrl + U / Cmd + U to open Hue/Saturation.
-
Adjust Hue for dramatic color changes.
-
You can also use Gradient Maps or Color Balance layers for creative tones.
 Step 7: Make It Loopable or Animated (Optional)
If you’re exporting this as a loop or social media reel:
-
Animate the explosion using frame-by-frame layer movement.
-
Or export multiple versions and combine in After Effects or Premiere Pro.
 Step 8: Add Final Touches
To enhance the realism and aesthetic of your artwork, try these final polish steps.
8.1 Add a Background Gradient or Image
-
Place a gradient layer or blurred background image behind the subject.
-
Use dark-to-light gradients to draw attention to the explosion.
8.2 Apply Sharpening
-
Merge all visible layers into a new one (
Ctrl + Shift + Alt + E). -
Go to Filter > Sharpen > Unsharp Mask.
-
Apply light sharpening to bring out particle texture.
8.3 Use Light and Shadows
-
Add shadows where the explosion meets the subject.
-
Use soft black brushes with low opacity for natural shading.
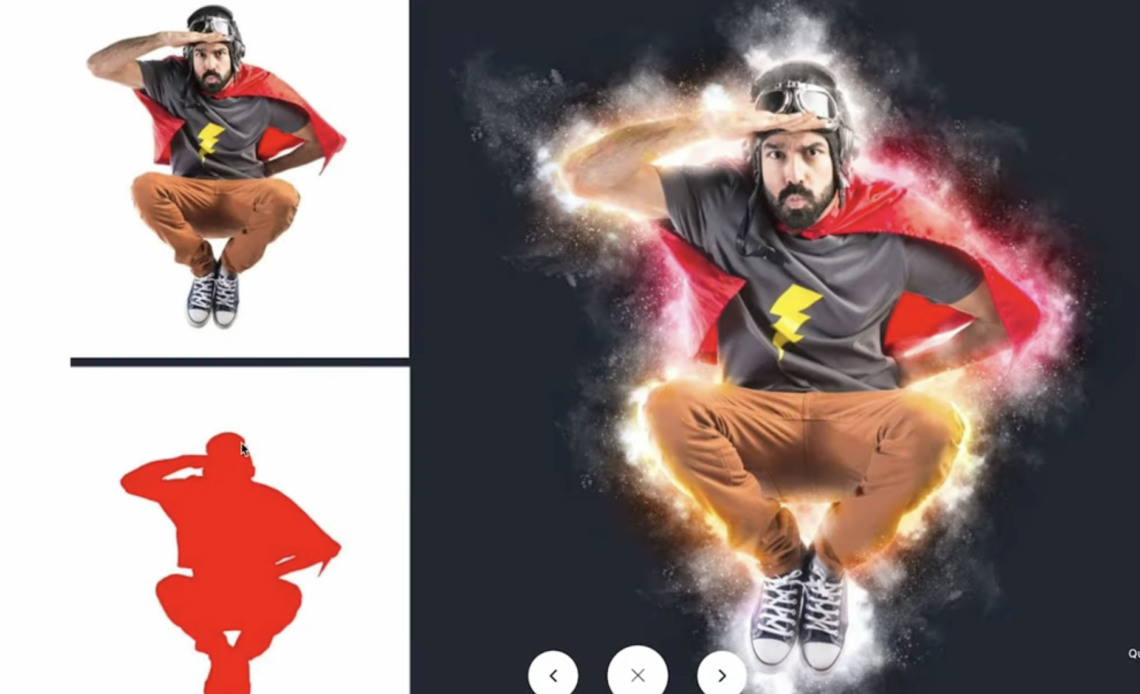
Before and After Showcase
A well-done dust explosion effect transforms a static image into a cinematic experience. Consider doing a split-screen (before/after) for portfolio or social media presentation.
You can also experiment with different subjects — animals, sports figures, vehicles — to see how the dust adapts creatively.
 Pro Tips for Better Results
-
Choose high-res subjects with clear outlines.
-
Keep your brush strokes concentrated on one side of the subject.
-
Use contrasting colors between dust and subject for high visual impact.
-
Don’t overdo the dust — sometimes, less is more.
-
Save your Photoshop file with organized groups to easily edit later.
 Exporting the Final Image
When you’re ready to show your masterpiece:
-
Go to File > Export > Save for Web (Legacy).
-
Choose JPEG or PNG with high quality.
-
For social platforms, crop to aspect ratios like 1:1 or 4:5.
 FAQs
FAQs
Q: Can I use this effect on any image?
Yes, but it works best on high-contrast images with clearly defined subjects.
Q: What version of Photoshop do I need?
Most recent versions (CC 2018 or later) work fine. Just ensure they support brushes and actions.
Q: Do I need graphic design experience?
Not necessarily. As long as you can follow the steps and use basic tools like brushes and layers, you’re good to go.
 SEO Keywords Used
-
dust explosion effect in Photoshop
-
how to create dispersion effect
-
Photoshop action tutorial
-
advanced photo manipulation tutorial
-
motion effect in still images
-
using brushes in Photoshop
-
install Photoshop actions
-
high-end visual effects in Photoshop
 Conclusion
You’ve now mastered a dramatic, professional-level visual effect using Photoshop: the dust explosion. By blending Photoshop actions, brush techniques, and layer controls, you’ve created an effect often used in commercial posters and motion graphics.
This tutorial isn’t just a one-time trick — it’s a versatile process that you can tweak, adapt, and use across projects. Try different directions, colors, subject types, and brush combinations to make each piece truly unique.
Now it’s your turn. Pick a photo, load the assets, and turn your static image into an explosive story!