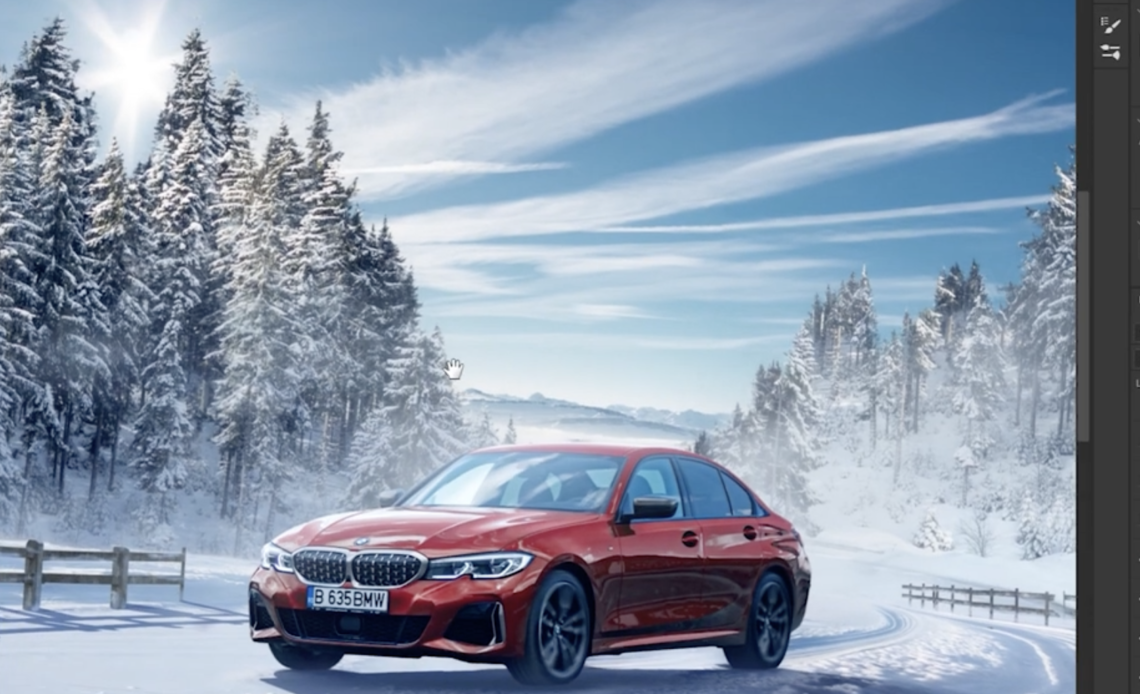
Creating a high-end commercial car advertisement in Photoshop requires a mix of creative design, technical skills, and attention to detail. In this guide, we will walk through the entire process of designing a BMW car advertisement, from background expansion to color correction, atmospheric effects, and final color grading. By the end of this tutorial, you will have a strong understanding of photo manipulation techniques used in professional automotive ads.
Step 1: Setting Up the Background
The first step in commercial design is setting up the background, as it sets the mood and tone for the final composition.
Expanding the Sky
- The sky plays a crucial role in defining the atmosphere of the image.
- If the sky in the original image is too small, use Generative Fill in Photoshop to expand it.
- Once expanded, apply Curves Adjustment Layer to increase brightness and balance the exposure.
- If the sky becomes too saturated, use Hue/Saturation Adjustment Layer to selectively desaturate cyan tones.
Selecting the Right Sky Image
- Always choose a high-resolution sky image with natural color transitions.
- Avoid skies that are too busy or have extreme lighting, as they may not blend well.
- Match the lighting direction of the sky with the rest of the scene.
Adding Trees to Create Depth
- To frame the scene, add trees to both the right and left sides of the image.
- Use Channels Selection to isolate the trees and remove the background.
- If the edges appear rough, use a tree brush to mask imperfections and blend them smoothly.
- Apply Color Balance and Hue/Saturation Adjustments to match the tree colors to the environment.
Pro Tip: Always use separate layers for different elements to retain flexibility in adjustments.
Step 2: Creating the Road and Ground Elements
A well-structured ground anchors the car into the scene, making it appear more realistic.
Compositing Multiple Road Textures
- To create a custom ground, combine multiple road images.
- Arrange and warp the textures using the Puppet Warp Tool to follow the perspective of the car.
- Use Curves and Color Balance to match the tones of each road piece.
Fixing Color Discrepancies
- The road textures might have varying brightness and colors.
- Apply Color Balance Adjustment Layers to shift the hues towards cyan and blue.
- Use Curves to darken or lighten sections for consistency.
Enhancing Ground Texture
- Add subtle grain and noise to blend different road textures naturally.
- Use Dodge and Burn tools to enhance shadow and highlight areas.
- Create soft tire marks or dust effects to integrate the car realistically.
Step 3: Adding Atmospheric Effects for Depth
Depth is crucial in commercial photo manipulation to create a professional, high-end look.
Adding Atmospheric Perspective
- Create an atmosphere effect by applying a soft white gradient to distant areas.
- Use solid color layers with low opacity in Multiply Mode to subtly darken shadowed regions.
- Apply Gaussian Blur to background elements to enhance depth.
Remember: Objects further from the camera appear less detailed and slightly faded due to atmospheric perspective.
Enhancing the Environment with Fog
- Apply soft fog effects using custom cloud brushes.
- Blur distant elements slightly to mimic a natural depth of field.
- Add soft light glows to simulate sun rays filtering through the atmosphere.
Step 4: Placing the Car and Integrating It Into the Scene
Now that the background and ground are set, it’s time to place the BMW car into the composition.
Adjusting the Car’s Placement and Shadows
- Position the car carefully, ensuring it aligns with the road perspective.
- Add shadows beneath the car to create a realistic grounding effect:
- Use a Multiply Layer and paint soft shadows with a black brush.
- Create a Contact Shadow right under the tires, which should be darker and sharper than the surrounding shadow.
Matching the Car’s Colors to the Scene
- If the car looks too warm or off-tone, adjust it using Curves and Color Balance.
- Shift the midtones and shadows towards blue/cyan to blend with the cold atmosphere.
- Increase highlights slightly to make the car shine in the snowy environment.
Step 5: Adding Foreground Elements for a Cinematic Look
Foreground elements help guide the viewer’s eyes towards the main subject.
Placing a Wooden Fence
- A wooden fence helps add structure and directs attention toward the car.
- Duplicate the fence and position it on both sides of the road.
- Add shadows and highlights to make it match the lighting of the scene.
Enhancing the Foreground With Snowy Grass
- Use a grass brush to paint foreground elements.
- Adjust the color and brightness to match the environment.
- Apply motion blur if necessary to simulate depth of field effects.
Step 6: Adding Motion and Speed Effects to the Car
Since this is a commercial advertisement, it’s important to convey a sense of movement and power.
Creating Motion Blur for the Wheels
- Duplicate the car layer.
- Go to Filter > Blur Gallery > Spin Blur.
- Adjust the blur on the wheels only to create a realistic spinning effect.
Adding Speed Trails and Snow Particles
- Use dust and snow textures around the tires.
- Apply motion blur to enhance the sense of speed.
- Use Overlay or Screen blending modes to integrate the snow realistically.
Step 7: Final Color Grading and Enhancements
Now that the composition is complete, the final step is color grading to unify all elements.
Enhancing the Overall Contrast
- Use Curves Adjustment Layer to add more contrast.
- Slightly lift the shadows to give a cinematic fade.
Adjusting the Lens Perspective
- Open Camera Raw Filter and adjust the Lens Distortion to simulate a wider-angle shot.
- This makes the image feel more dramatic and professional.
Adding Sunlight and Lens Flares
- Use a warm glow (light orange) near the light source to create realistic reflections.
- Add a lens flare subtly in the background to enhance realism.
Creating the Final Cinematic Look
- Apply Selective Color Adjustments to fine-tune the reds and blues.
- Slightly desaturate the background to ensure the car remains the focal point.
- Add a final sharpen filter to enhance clarity.
Conclusion: Creating a Professional BMW Advertisement
By following these steps, we have successfully created a commercial-grade BMW advertisement in Photoshop. This project required: ✅ Advanced compositing techniques (merging multiple images seamlessly) ✅ Color correction and matching (ensuring all elements fit together) ✅ Realistic lighting and shadows (to integrate the car properly) ✅ Motion and effects (to enhance the power and speed of the vehicle) ✅ Final cinematic grading (to give the image a professional, high-end look)
With these Photoshop techniques, you can create stunning automotive advertisements for luxury brands and elevate your photo manipulation skills to the next level.
🚀 If you want to master photo manipulation, practice these techniques and experiment with different environments and lighting conditions.