The wiggle expression in Adobe After Effects is one of the most powerful tools for creating randomized movementwithout manual keyframing. It allows you to add natural motion to position, scale, rotation, and even effects. However, many beginners struggle with controlling it, leading to erratic animations that lack refinement.
In this guide, we’ll demystify the wiggle expression, showing you how to use it properly, control it effectively, and apply it dynamically within your animations. By the end, you’ll know how to:
✅ Apply the wiggle expression to any transform property. ✅ Use null objects and sliders to control the frequency and amplitude. ✅ Integrate wiggle with animation principles like anticipation. ✅ Save your wiggle setup as an animation preset for future projects.
Let’s dive in!
Step 1: Setting Up the Composition
Before applying the wiggle expression, we need to create a working composition.
- Create a New Composition:
- Name it
Wiggle Comp - Set dimensions:
1920x1080(HD resolution) - Frame rate:
24 FPS - Duration:
15 seconds
- Name it
- Add a Shape Layer:
- Select the Ellipse Tool (Q) and create a small circle.
- Rename the layer to
Circle.
- Open the Position Property:
- Select the
Circlelayer. - Press
Pto reveal the Position property.
- Select the
Now we’re ready to apply the wiggle expression!
Step 2: Basic Wiggle Expression
To apply the wiggle expression:
- Alt/Option + Click on the Position stopwatch.
- Type the following expression:
wiggle(5,100);5is the frequency (times per second the object moves).100is the amplitude (maximum movement in pixels).
Previewing the Animation
- Press
Spacebarto play the animation. - The circle moves randomly within a 100-pixel range at 5 movements per second.
You can experiment with different values:
- Slow movement:
wiggle(1,50); - Fast and erratic:
wiggle(10,200);
✅ Pro Tip: You can apply wiggle to any transform property—position, scale, rotation, opacity, or even effects.
Step 3: Applying Wiggle to Multiple Properties
To wiggle multiple properties:
- Open additional transform properties:
Sfor ScaleRfor RotationTfor Opacity
- Alt/Option + Click on each stopwatch.
- Enter a customized wiggle expression for each property:
wiggle(3,30); // Scale wiggle(2,20); // Rotation wiggle(1,50); // Opacity - Preview the animation.
Now the shape has random movement across multiple parameters, creating a more organic feel.
Step 4: Controlling the Wiggle Expression with Sliders
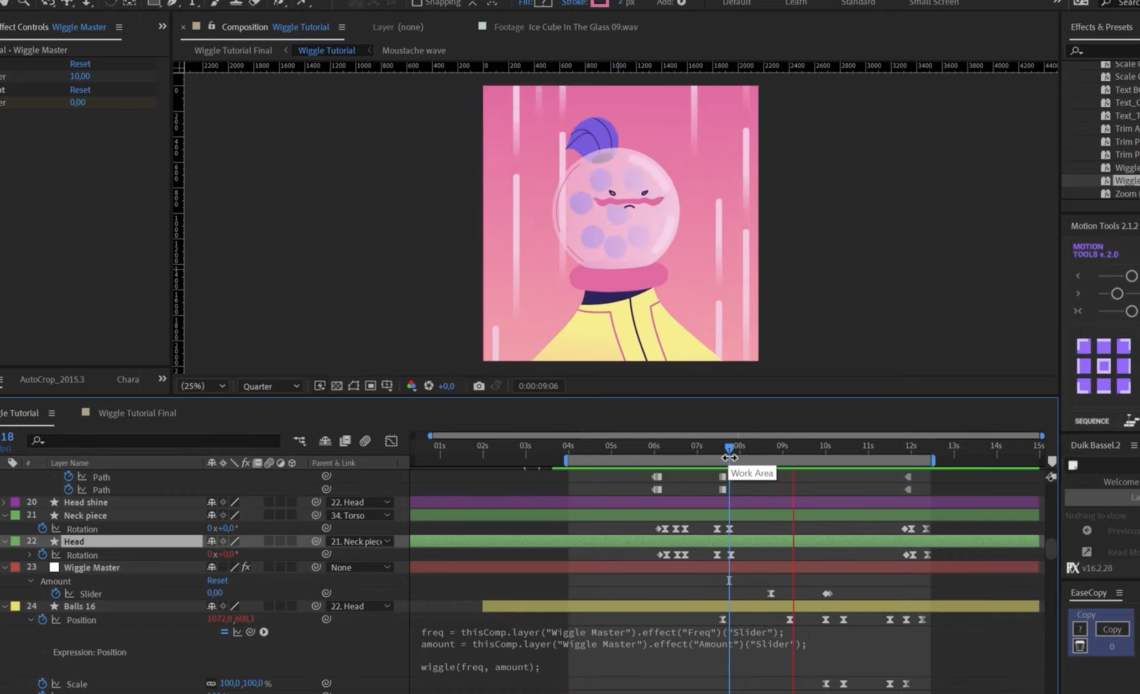
By default, wiggle affects the entire animation. But what if you only want it at a specific moment? The solution is using a null object with slider controls.
1. Create a Null Object
- Go to
Layer > New > Null Object. - Rename it to
Wiggle Master.
2. Add Slider Controls
- Select
Wiggle Master. - Go to
Effects > Expression Controls > Slider Control. - Add two sliders and rename them:
Frequency(for speed)Amplitude(for intensity)
3. Link the Sliders to the Wiggle Expression
- Open the
Circleposition expression. - Modify the expression:
freq = thisComp.layer("Wiggle Master").effect("Frequency")("Slider"); amp = thisComp.layer("Wiggle Master").effect("Amplitude")("Slider"); wiggle(freq, amp); - Now, adjusting the slider values in
Wiggle Masterchanges the wiggle effect dynamically!
✅ Pro Tip: You can animate the sliders to increase and decrease the wiggle over time.
Step 5: Controlling Wiggle Timing with Keyframes
Problem: Wiggle Applies to the Whole Animation
To limit the wiggle effect to specific frames:
- Set keyframes for the Frequency and Amplitude sliders.
- Example keyframe settings:
- Start:
Frequency = 0, Amplitude = 0 - At impact:
Frequency = 10, Amplitude = 50 - End:
Frequency = 0, Amplitude = 0
- Start:
Now, the wiggle only occurs when needed!
✅ Best Use Case: Impact animations, shaking effects, object anticipation.
Step 6: Saving the Wiggle Setup as an Animation Preset
Once you have the Wiggle Master setup, save it for future projects.
1. Select the Wiggle Master Layer
- Press
Uto reveal keyframed expressions. - Select Frequency, Amplitude, and Position expressions.
2. Save as an Animation Preset
- Go to
Animation > Save Animation Preset. - Choose a folder inside
Adobe > After Effects > Presets. - Name it
Wiggle Master Preset.
3. Applying the Preset
- In a new project, go to
Effects & Presets. - Search for
Wiggle Master Preset. - Drag it onto a null object.
Now, you can reuse the wiggle setup instantly!
Conclusion
By following this guide, you have learned how to apply, control, and refine the wiggle expression in After Effects. The wiggle expression is a powerful tool, and when used correctly, it enhances motion graphics significantly.