Pop art is a bold, vibrant, and high-contrast graphic design style that has been popular for decades. Whether you’re looking to create stunning retro artwork or unique social media visuals, mastering the pop art effect in Adobe Photoshop will enhance your creative skills.
In this tutorial, we will explore two different pop art effects:
- Posterize Effect with Color Overlays and Patterns
- Halftone and Posterize Effect with Transparency Adjustments
By following this guide, you’ll learn how to use Photoshop tools like levels adjustment, posterize effects, halftones, and color overlays to achieve the desired look. This tutorial is beginner-friendly but also includes advanced techniques to refine your skills.
Let’s get started!
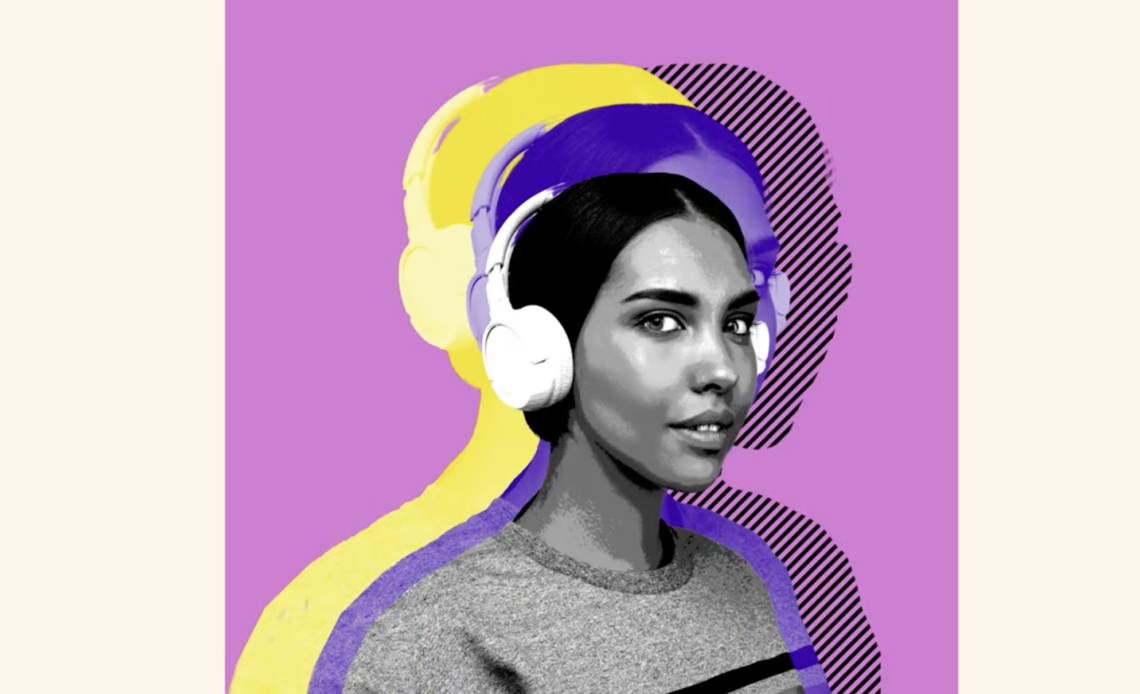
Design 1: Posterize Effect with Color Overlays and Patterns
Step 1: Preparing the Image
- Open Adobe Photoshop and import your image by going to File > Open.
- Convert the image into a Smart Object by right-clicking on the layer and selecting Convert to Smart Object. This allows for non-destructive editing.
- Use the Object Selection Tool (W) to select the subject. Photoshop will automatically detect the edges.
- Click on Select and Mask to refine the selection. Use the Refine Edge Brush Tool to smooth out hair and edges.
- Once the selection is refined, click OK, then click on the Mask Icon at the bottom of the Layers panel to remove the background.
- If needed, use the Brush Tool (B) on the mask layer to clean up any leftover background areas.
Step 2: Converting to Black & White and Adjusting Levels
- With your subject selected, go to Image > Adjustments > Black & White.
- In the settings, choose Maximum Black to enhance contrast.
- Next, adjust the brightness by navigating to Image > Adjustments > Levels.
- Move the Shadows (Left Slider) inward to darken the blacks and the Highlights (Right Slider) to brighten whites.
- Click OK to apply the changes.
🎨 Tip: Increasing contrast makes the pop art effect more dramatic and visually appealing.
Step 3: Adding a Vibrant Background
- Create a new layer below the subject and fill it with a solid color using Alt + Backspace.
- Choose a bold and bright color such as magenta (#CF6BAA) or yellow.
- If you want to create a gradient background, select the Gradient Tool (G) and choose two vibrant colors to blend smoothly.
- Adjust the Opacity of the background layer if needed to control brightness.
Step 4: Duplicating and Scaling the Layers
- Select the subject layer and duplicate it using Ctrl + J (Windows) / Command + J (Mac).
- Move the duplicate layer below the original and scale it up slightly (Ctrl + T / Command + T).
- Repeat this process to create multiple layers with varied sizes.
Step 5: Applying Color Overlays to Each Layer
- Double-click each layer to open the Layer Style panel.
- Select Color Overlay and choose different colors for each layer (e.g., blue, yellow, or red).
- Adjust the Blending Mode to Multiply for better integration.
- If the colors look too harsh, lower the Opacity to blend them more smoothly.
🎨 Tip: Use complementary colors to create a more striking effect!
Step 6: Adding a Pattern Overlay
- Create a new Pattern Layer by selecting Layer > New Fill Layer > Pattern.
- Choose a line or checkered pattern.
- Adjust the Scale to achieve the desired effect.
- Change the Blend Mode to Multiply and reduce opacity if needed.
🎨 Tip: If you don’t have a pattern, create one using the Pen Tool (P) or Shape Tool (U), then define it as a pattern under Edit > Define Pattern.
Step 7: Applying the Posterize Effect
- Select the main subject layer and go to Image > Adjustments > Posterize.
- Set the Levels to around 6 for a classic pop art look.
- Fine-tune the brightness using Image > Adjustments > Levels if needed.
Design 2: Halftone and Posterize Effect with Transparency Adjustments
Step 1: Preparing the Image
- Open a new image and convert it to a Smart Object.
- Use the Object Selection Tool (W) to remove the background and apply a Layer Mask.
- Adjust Select and Mask settings to refine edges and enhance the selection.
Step 2: Applying Black & White and Levels Adjustments
- Convert the image to Black & White using Image > Adjustments > Black & White.
- Adjust Levels to increase contrast for a striking pop art effect.
Step 3: Creating Color Backgrounds
- Create two new layers beneath the subject.
- Fill the first layer with a bright magenta color using Alt + Backspace.
- Fill the second layer with a bold blue color.
Step 4: Applying Hue & Saturation Colorization
- Select one of the duplicate layers and go to Image > Adjustments > Hue/Saturation.
- Check Colorize and adjust the hue to a blue tone.
- Repeat the process for the other duplicate layers with different colors.
Step 5: Adding a Halftone Effect
- Make sure the Foreground color is black and Background color is white.
- Go to Filter > Filter Gallery > Halftone Pattern.
- Adjust the Size and Contrast for the best pop art effect.
- Apply the Multiply Blend Mode for seamless integration.
Step 6: Fine-tuning Placement and Blending
- Adjust the position of each layer for a dynamic composition.
- Use the Opacity Slider on different layers for better transparency effects.
Final Adjustments and Exporting
- Select all layers and group them using Ctrl + G / Command + G.
- Make final tweaks to colors, opacity, and positioning.
- Export the design by selecting File > Export > Save for Web (Legacy).
- Choose PNG or JPG format, ensuring high resolution for print or digital use.
Conclusion
By following this step-by-step tutorial, you’ve learned how to create two stunning pop art designs in Photoshop. Each technique offers a unique take on the pop art effect:
- First Design: Uses the Posterize Effect with Color Overlays and Patterns.
- Second Design: Combines Halftone, Transparency Adjustments, and Posterization.
These techniques can be customized further to suit your style. Experiment with different color palettes and patterns to create your own signature pop art designs.