Creating hyper-realistic half-drawn sketches in Photoshop is easier than you think! In this tutorial, we will explore a powerful yet underused tool in Photoshop: the Art History Brush. This tool allows you to create stunning sketch effects effortlessly, mimicking the look of a hand-drawn pencil sketch.
Whether you are an experienced digital artist or a beginner, this step-by-step guide will help you achieve a professional-looking sketch effect in just a few minutes. Let’s dive in!
What You Will Need
- Adobe Photoshop (any version with the Art History Brush)
- A high-resolution image (3000–5000 pixels recommended for better details)
- Custom Art History Brush preset (you can download a preset or create your own)
- Patience and creativity
Step 1: Prepare Your Image
First, open your image in Photoshop. Keep in mind that the size of your image impacts the final result—higher resolution images will yield more detailed sketches.
Convert Image to Black and White
To achieve a pencil sketch effect, we need to remove the color from the image:
- Press Cmd + Shift + U (Mac) or Ctrl + Shift + U (Windows) to desaturate the image.
- This step ensures that the Art History Brush picks up only grayscale values.
Step 2: Set Up the Art History Brush
The Art History Brush is a special tool in Photoshop that paints using the pixel information from a previous snapshot in the History Panel.
Accessing the Art History Brush
- Select the Art History Brush from the toolbar (it has a small spiral icon).
- Ensure that your History Panel is open (Window > History).
Create a Snapshot
- Click the New Snapshot button in the History Panel.
- Name it “Black and White Sketch” and ensure the Merged Layers option is selected.
- Click on the small paintbrush icon next to the snapshot to set it as the source.
Step 3: Load and Use a Custom Brush
To get the best sketch effect, use a specialized brush preset.
Import the Brush
- Open the Brushes Panel (Window > Brushes).
- Click on the hamburger menu and choose Import Brushes.
- Select the Pencil Sketch Brush preset and load it.
Apply the Brush Effect
- Create a new layer above your image.
- Fill the layer with white by pressing Cmd + Delete (Mac) or Ctrl + Backspace (Windows).
- Select the Art History Brush, and start sketching on the white layer.
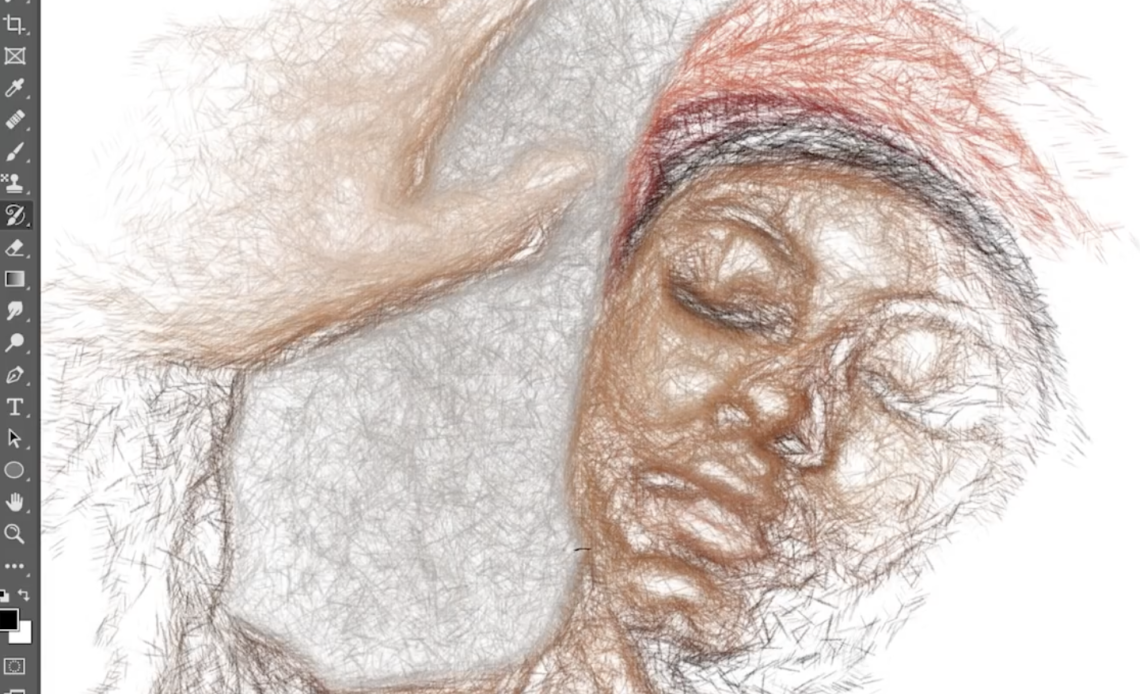
As you paint, you’ll notice that the brush follows the contours of the image, creating a hand-drawn effect. The more you hover over an area, the more detail is revealed.
Step 4: Refining the Sketch Effect
The key to achieving a natural-looking sketch is control and layering. Instead of painting everything at once, use a light touch to build up details gradually.
Adding More Detail
- Use light, controlled strokes to outline the subject.
- Avoid over-painting, as it can make the effect look too artificial.
- Focus on key areas like the eyes, hair, and clothing folds in a portrait.
Filling in Small Details
Sometimes, small features like nostrils or deep shadows don’t fill in well with the default brush. To solve this:
- Use the Pencil Sketch Fill Brush (if available) to enhance missing details.
- Apply this sparingly to maintain a hand-drawn aesthetic.
Step 5: Experimenting with Textures
To enhance realism, try overlaying textures such as paper or charcoal textures.
Adding Paper Texture
- Download a high-resolution paper texture.
- Place it above your sketch layer.
- Set the blending mode to Multiply.
- Adjust opacity for a natural effect.
Step 6: Creating a Colored Pencil Sketch Effect
While the default effect is black and white, you can also use the Art History Brush to create colored pencil sketches.
Keeping the Original Colors
- Instead of desaturating the image, keep it in full color.
- Create a new white layer and use the Art History Brush directly on it.
- This will recreate the effect using the original colors, mimicking a colored pencil drawing.
Step 7: Bonus Brushes for Texture Labs Patreon Supporters
For those who want more advanced effects, Texture Labs offers exclusive brush sets on Patreon:
- Charcoal Sketch – A rough, textured charcoal look.
- Line Artist – Emphasizes outlines with sharper angles.
- Pastel Sketch – A soft, blended pastel effect.
If you support Texture Labs on Patreon, you can access these additional resources.
Conclusion
The Art History Brush is an incredibly powerful tool for creating digital sketch effects. Whether you want a fine pencil drawing or a colored pencil look, this technique provides an easy way to achieve professional results.
Key Takeaways:
- The Art History Brush samples from a history snapshot to create realistic sketch effects.
- Use custom brush presets for more control and detail.
- Work on a separate white layer to maintain flexibility.
- Experiment with textures and colors to enhance realism.
Now, it’s your turn! Download the brush preset, try out this technique, and share your results. Happy sketching