Adobe Photoshop is packed with powerful tools and hidden features that can elevate your designs and significantly enhance your workflow. Whether you are a beginner or an experienced designer, learning new tricks can help you speed up your editing process, improve accuracy, and unleash your creativity.
In this tutorial, we’ll explore five advanced Photoshop tricks that will help you create stunning effects, improve selections, and manipulate images like a pro.
By the end of this guide, you’ll learn how to: ✔ Use Gradient Maps for creative color effects. ✔ Extract smoke, clouds, and similar elements from dark backgrounds. ✔ Create realistic water reflections for stunning compositions. ✔ Turn objects into golden, liquid-like elements. ✔ Generate realistic trees within Photoshop.
Let’s dive in! 🚀
Trick 1: Magic with Gradient Maps
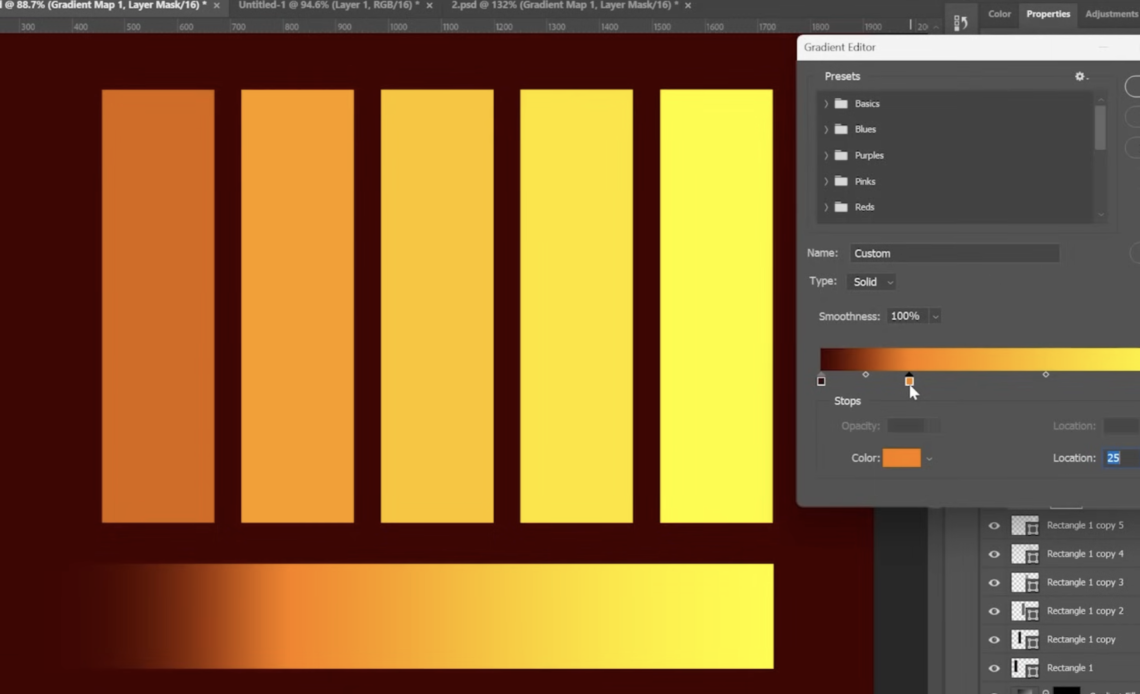
Gradient Maps are an incredible way to create special lighting effects, glowing designs, and unique color blends. They allow you to remap an image’s brightness values to a set of colors, creating stunning visual effects that work exceptionally well in photo manipulations, poster designs, and stylized portraits.
Step 1: Apply a Gradient Map
- Open your image in Photoshop.
- Go to Adjustments > Gradient Map.
- Click the gradient bar to open the Gradient Editor.
- Adjust the gradient colors:
- Set highlights (whites) to a bright yellow.
- Set midtones to orange or red.
- Set shadows (blacks) to dark red or black.
- Click OK and watch your image transform!
Step 2: Add a Painting Effect
- Create a new layer above your image.
- Select the Brush Tool (B) and choose a soft round brush.
- Set the foreground color to white.
- Reduce the Flow to about 6%.
- Lightly paint over the areas you want to glow.
- Change the Blending Mode of the layer to Screen.
Step 3: Fine-Tuning the Effect
- Lower the Opacity of the Gradient Map to create subtle color transitions.
- Use Layer Masks to apply the effect only to specific parts of the image.
- Experiment with different gradient color schemes for unique styles.
💡 Pro Tip: Use the Gradient Map in combination with layer masks to create selective lighting effects on specific parts of your image.
Trick 2: Selecting Smoke and Clouds from a Dark Background
Extracting smoke, fog, or clouds from a black background is tricky when using Screen Blending Mode because it can lose details in bright areas. Here’s a better method to isolate transparent elements with precision.
Step 1: Convert the Layer to Grayscale
- Duplicate your smoke/cloud layer.
- Press Ctrl + U (Cmd + U on Mac) to Desaturate the layer.
- Click OK.
Step 2: Adjust Curves for Selection
- Press Ctrl + M (Cmd + M on Mac) to open Curves.
- Drag the white point slider to brighten the highlights.
- Adjust the black point slider to keep the dark areas clean.
- Click OK.
Step 3: Copy & Create a Mask
- Press Ctrl + A to select the entire canvas.
- Press Ctrl + C to copy.
- Hide the current layer.
- Create a new layer mask on the original smoke/cloud layer.
- Hold Alt and click the mask thumbnail.
- Press Ctrl + Shift + V to paste the copied image into the mask.
Step 4: Refining the Mask
- Use a Soft Brush (B) to remove any unwanted edges.
- Apply a Gaussian Blur (2-5px) for a natural blend.
- Adjust Feathering in the Mask Properties panel.
💡 Pro Tip: Fine-tune the mask using Levels (Ctrl + L) to adjust transparency.
Trick 3: Creating Realistic Water Reflections
Water reflections add depth and realism to outdoor scenes, product renders, or fantasy artwork. Here’s a step-by-step guide to making them look natural.
Step 1: Duplicate and Flip the Image
- Duplicate the main image layer (Ctrl + J).
- Press Ctrl + T, then Right Click > Flip Vertical.
- Drag the flipped layer down to position it like a reflection.
Step 2: Apply Motion Blur for a Water Effect
- Go to Filter > Blur > Motion Blur.
- Set the Angle to 90°.
- Adjust the Distance to create a slight ripple effect.
Step 3: Blend with a Water Texture
- Import a water texture image.
- Set the Blending Mode to Overlay or Multiply.
- Adjust opacity for realism.
💡 Bonus Tip: Use the Liquify Tool (Filter > Liquify) to create subtle distortions for added realism.
Trick 4: Turning an Object into a Golden Liquid Effect
Transforming an object into golden, glossy metal creates a luxurious and eye-catching look, often used in premium branding and commercial designs.
Step 1: Convert the Image to Black & White
- Open your image.
- Go to Adjustments > Hue/Saturation and desaturate it.
- Go to Adjustments > Curves and increase contrast.
Step 2: Apply a Plastic Wrap Effect
- Press Ctrl + J to duplicate the layer.
- Go to Filter > Filter Gallery > Artistic > Plastic Wrap.
- Adjust the settings to enhance highlights.
- Click OK.
Step 3: Apply a Gold Gradient
- Go to Adjustments > Gradient Map.
- Choose a gradient from Dark Gold to Light Gold.
- Click OK.
Trick 5: Generating Realistic Trees in Photoshop
Did you know Photoshop can generate realistic trees and plants? This trick is perfect for background details in photo manipulations and digital paintings.
Step 1: Open the Tree Generator
- Go to Filter > Render > Tree.
- Select a tree type from the dropdown.
- Adjust:
- Light Direction
- Leaves Amount & Size
- Branch Height & Thickness
- Click OK to generate the tree.
Conclusion
By mastering these five Photoshop tricks, you’ll unlock new creative possibilities:
✔ Gradient Maps – Create glowing color effects. ✔ Advanced Selections – Extract smoke, fog, and clouds perfectly. ✔ Water Reflections – Make realistic, rippling reflections. ✔ Golden Liquid Effect – Turn objects into glossy metal. ✔ Tree Generator – Quickly add realistic foliage to compositions.
Experiment with these techniques and elevate your Photoshop skills! Which trick was your favorite? Let us know in the comments!