Creating a Threshold Line Effect in Photoshop can add a stunning, high-contrast, graphic look to text and photos. This technique is great for posters, digital artwork, and typography-based designs. This tutorial will walk you through two different threshold effects:
- Text-Based Threshold Effect with Patterns
- Photo-Based Threshold Effect with Curve and Invert Adjustments
By the end of this tutorial, you’ll have a solid understanding of how to apply the Threshold effect, use Gaussian Blur, apply Curves, and tweak blending modes for creative results. You will also learn how to refine edges, manipulate line thickness, and add finishing touches to enhance the overall effect.
Design 1: Creating a Threshold Text Effect
Step 1: Creating a New Document and Adding Text
- Open Adobe Photoshop and create a new document by going to File > New.
- Set the dimensions to 3000×3000 pixels and click Create.
- Select the Type Tool (T) and type a letter or word (e.g., “W”).
- Change the text color to black and adjust the font to Arial Black or any bold, thick font.
- Scale the text to the desired size using Ctrl + T (Windows) / Cmd + T (Mac).
- Convert the text into a Smart Object by right-clicking the layer and selecting Convert to Smart Object.
Step 2: Creating and Applying a Line Pattern
- Create a new document (200×200 pixels).
- Use the Rectangle Tool (U) to create a 100×100 pixel square, filling it with black.
- Duplicate the square and place it next to the first one.
- Fill the second square with white to create a black-and-white pattern.
- Go to Edit > Define Pattern, name it (e.g., “Line Pattern”), and click OK.
- Return to the main design, select Pattern Overlay from the Layer Style panel, and choose the newly created pattern.
- Adjust the scale to achieve the desired effect.
- Convert the pattern into a Smart Object.
Step 3: Applying the Threshold Effect
- Change the blending mode of the pattern layer to Multiply.
- Add a Threshold Adjustment Layer by going to Layer > New Adjustment Layer > Threshold.
- Hide the threshold effect temporarily.
- Apply Gaussian Blur to both the text and pattern layers (Filter > Blur > Gaussian Blur).
- Adjust the blur radius until you get a soft effect.
- Enable the Threshold Adjustment Layer and adjust the slider to get the desired look.
Step 4: Refining the Effect with Curves
- Add a Curves Adjustment Layer between the text and pattern layers.
- Adjust the curve sliders to control the thickness of the black and white lines.
- Experiment with curve points to manipulate line contrast and spacing.
- Fine-tune the Threshold and Gaussian Blur values if necessary.
Step 5: Customizing the Text
- Double-click the Smart Object to edit the text.
- Change the letter to another character (e.g., “S”).
- Save the Smart Object file and return to the main Photoshop file.
- Resize and reposition the new text as needed.
- Apply the same threshold effect and refine the curves for consistency.
🎨 Pro Tip: Adjusting the Gaussian Blur and Curves Layer helps in refining the final look by controlling line thickness and contrast.
Design 2: Applying the Threshold Effect to a Photo
Step 1: Creating a New Document and Importing an Image
- Open a new document with dimensions 1000×1000 pixels.
- Drag and drop your photo into Photoshop.
- Convert the image to black and white using Image > Adjustments > Black & White.
- Apply Levels adjustments to enhance contrast.
- Convert the image into a Smart Object for non-destructive editing.
Step 2: Creating a Mask and Scaling the Image
- Select the Elliptical Marquee Tool (M) and draw a circle around the main subject.
- Click Add a Mask to isolate the subject.
- Use Ctrl + T (Windows) / Cmd + T (Mac) to resize and reposition the image.
- Convert the masked layer into a Smart Object.
Step 3: Applying a Pattern Overlay to the Image
- Apply the Line Pattern created earlier.
- Scale down the pattern size to fit the image.
- Convert the pattern layer into a Smart Object.
- Change the blending mode to Multiply.
Step 4: Applying Threshold and Gaussian Blur
- Add a Threshold Adjustment Layer.
- Apply Gaussian Blur to both the image and pattern layers.
- Reduce the blur strength on the image to 1px for better definition.
- Enable the Threshold layer and fine-tune the effect.
Step 5: Refining with Curves and Invert Adjustments
- Add a Curves Adjustment Layer.
- Move the bottom curve point upwards and the top point downwards to invert the contrast.
- Add an Invert Adjustment Layer on top to create a negative effect.
- Adjust the Threshold, Curves, and Blur settings for the best look.
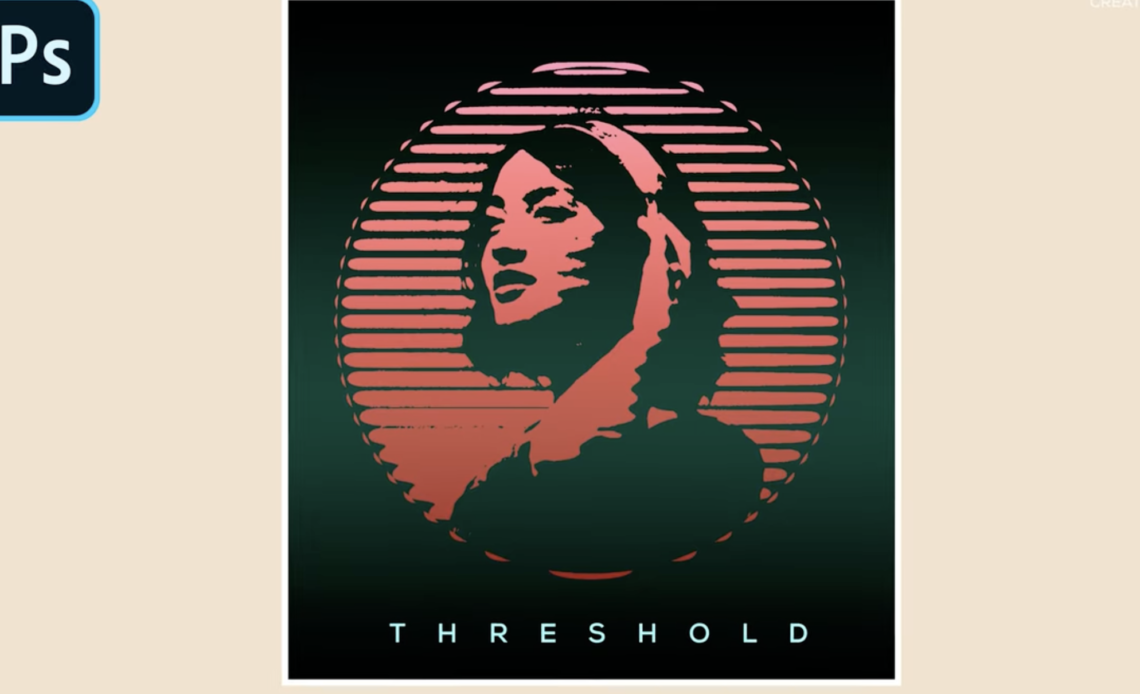
Step 6: Adding a Gradient Overlay for a Pop Art Look
- Add a new Gradient Fill Layer on top.
- Choose a bold color combination (e.g., red, pink, and light magenta).
- Set the blending mode to Multiply.
- Adjust the gradient angle and opacity for a subtle glow.
- Add a second gradient with a greenish tint for additional contrast.
Step 7: Adding Text for a Finishing Touch
- Type “THRESHOLD” using the Type Tool (T).
- Set the font color to white.
- Change the blending mode to Vivid Light.
- Lower the opacity slightly for a smoother blend.
- Adjust the text position and finalize the composition.
🎨 Pro Tip: Try experimenting with different fonts and colors to make the design more dynamic.
Final Adjustments and Exporting
- Group all layers (Ctrl + G / Cmd + G) for a cleaner workspace.
- Resize or reposition elements as needed.
- Check Levels, Curves, and Blur settings for a polished look.
- Go to File > Export > Save for Web (Legacy) to save the final design.
- Choose PNG or JPG format for high-quality output.
Conclusion
By following this tutorial, you’ve learned how to create two different Threshold Line Effects in Photoshop:
- Text-Based Effect with Gaussian Blur and Pattern Overlays.
- Photo-Based Effect using Curves, Invert Adjustments, and Gradient Overlays.
Both techniques give a bold, high-contrast look perfect for posters, album covers, and modern graphic designs. The key to mastering this effect is experimenting with Threshold, Curves, and Blur settings to achieve unique variations.