Creating a seamless tunnel animation in After Effects can seem challenging, but with the right approach, it becomes an easy and enjoyable process. This tutorial will break down the steps required to achieve a smooth, looping tunnel animation using simple effects and expressions. We’ll cover everything from setting up the base design in Illustrator to refining motion and rendering the final animation.
Step 1: Setting Up the Base Design in Illustrator
Before jumping into After Effects, it’s helpful to set up a base design in Adobe Illustrator:
Creating the Checkered Pattern
- Create a 1080×1920 artboard to match the animation dimensions.
- Design a checkered pattern that will serve as the base of the tunnel.
- Use the Shape Tool (M) or Pen Tool (P) to create alternating colored squares.
- Duplicate the pattern and create a colorful version that mimics the reference design.
- Save the Illustrator file and prepare it for import into After Effects.
Exporting the Design
To bring the Illustrator design into After Effects:
- Use Overlord (if available) for a seamless AI-to-AE workflow.
- If not, save the file as an AI document and import it manually into After Effects.
- Convert layers to shape layers in After Effects if needed.
Once the base design is ready, we can start animating in After Effects.
Step 2: Setting Up the Looping Animation
- Import the Illustrator file into After Effects.
- Duplicate the checkered layer in the timeline.
- Add two position keyframes – one at the start and one at the 2-second mark.
- In the second keyframe, move the duplicated layer down so that it aligns with the original.
- Parent the first layer to the second to maintain their relationship.
- Add an expression to the position property to ensure infinite looping:
loopOut()This ensures that the animation continues without interruption.
Step 3: Precomposing and Adding Hexagon Layers
- Precompose the animated checkered pattern to keep the composition clean.
- Import additional elements such as the hexagon and guiding lines.
- Position the hexagon in the center of the composition to act as the focal point.
- Lock the hexagon layer to avoid accidental movements.
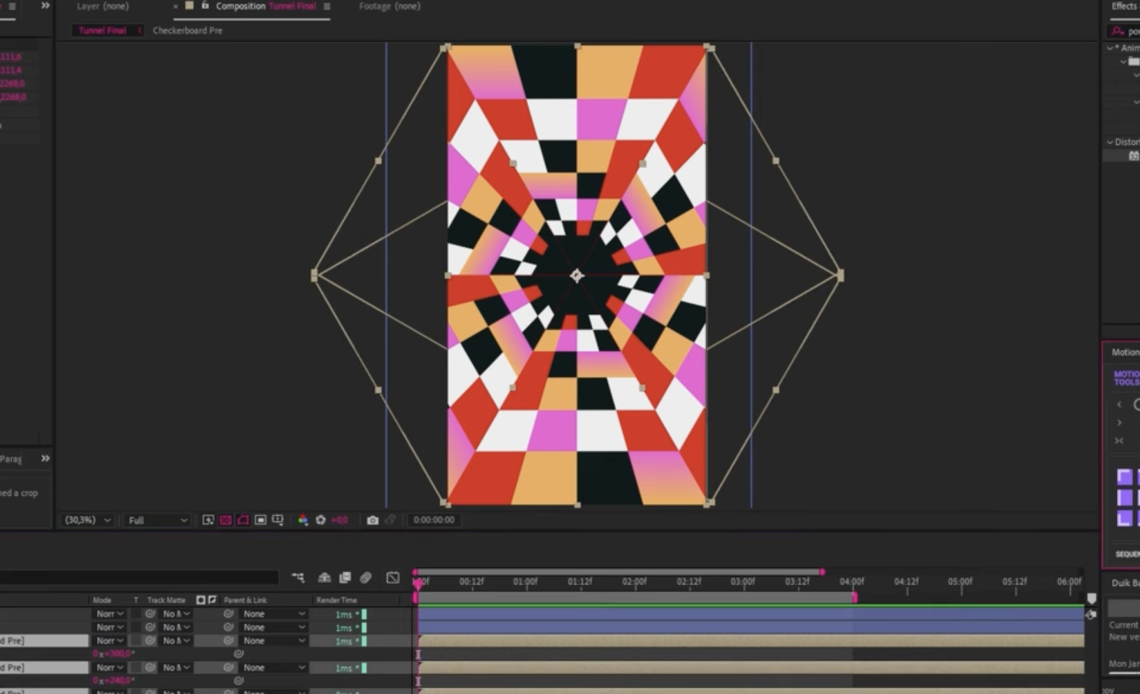
Step 4: Using the Power of Corner Pin
To create a dynamic perspective, we need to manipulate the checkered pattern:
- Apply the Corner Pin effect (
Effects > Distort > Corner Pin). - Manually adjust the corners to align with the tunnel perspective.
- If distortion occurs, try using CC Power Pin instead.
- Adjust the Perspective setting to 50%, which helps reduce unwanted distortion.
Alternative Approach: Using 3D Space
If the 2D distortions don’t give the right look, consider:
- Turning the checkered pattern into a 3D layer.
- Adjusting the camera view and focal length to create a tunnel effect.
- Using the Vanishing Point Grid to align elements properly.
Step 5: Duplicating and Rotating the Checkered Pattern
To complete the tunnel effect, we need to fill the empty spaces:
- Duplicate the checkered composition multiple times.
- Rotate each duplicate by 60° to create a radial effect.
- Use mathematical values in the rotation property to ensure precision:
60 * index - Repeat the process until the entire tunnel is filled.
Step 6: Offsetting the Animations for a Smooth Flow
- Select all the checkered compositions.
- Use Motion Tools or manually offset them by 12 frames.
- Adjust their placement in the timeline to create a staggered effect.
- Fine-tune the animation curves in the Graph Editor for natural motion.
Step 7: Adding a Central Null Object for Global Animation Control
- Create a new Null Object in the center of the composition.
- Parent all checkered layers and the hexagon layer to the Null Object.
- Animate the Rotation of the Null Object:
- Add two rotation keyframes (1.5 seconds apart).
- Set the first keyframe to
-55°. - Use Easy Ease (F9) for smooth acceleration.
- Adjust the speed graph in the Graph Editor for dynamic motion.
Step 8: Masking the Tunnel Edges for a More Refined Look
- Solo the bottom-most checkered layer.
- Disable the effect visibility in the Effects Panel.
- Use the Pen Tool to create a mask, covering the bottom half of the shape.
- Set the mask to “Subtract” to remove the bottom section.
- Add two keyframes for the mask path and adjust the movement:
- Move the mask downward in the second keyframe.
- Adjust individual path points to vary the reveal speed.
- Offset the mask animation for each composition to add variation.
Step 9: Refining the Final Animation
- Apply Motion Blur to enhance realism.
- Add a Glow Effect for a futuristic look.
- Use a Camera Layer with Depth of Field for added dimension.
- Apply Chromatic Aberration to add subtle color separation.
Step 10: Exporting the Final Animation
Once you are satisfied with the animation:
- Go to Composition > Add to Render Queue.
- Select a high-quality codec (such as H.264 or Apple ProRes).
- Render and export the animation for use in your project.
Tips for Optimized Rendering
- Use Adobe Media Encoder for better file compression.
- Adjust the bitrate settings for a balance between quality and file size.
- Export a GIF version if needed for web animations.
Conclusion
This tutorial covered how to create a seamless tunnel animation using After Effects. By leveraging key techniques such as looping animations, corner pinning, rotation offsets, and masking, you can build a dynamic and engaging effect suitable for motion graphics and VFX.
Final Thoughts
- Experiment with colors, glow effects, and motion blur to customize the tunnel to your style.
- Try adding sound effects for a more immersive experience.
- Play with different animation speeds to achieve unique results.
With these techniques, you now have everything you need to create an eye-catching tunnel animation. Happy animating!